In This Article
Introduction
In the first Turtle to Rabbit WordPress optimization article, Put Images on a Diet, I decreased page load time by reducing data. In this article I show how I get data to the user sooner by using a WordPress cache plugin. Specifically, I will cache my HTML pages so that WordPress, running on my slow web host, does not need to regenerate pages every time a user visits my site.
Like every article in this series, I will work on my Pretend Web Design webpage that I built to showcase many of the optimization issues I come across. I believe server-side caching will bring the next best performance improvement for mobile users.
Cached or Not?
How do I know if my visitors are sent a cached HTML page or if every visit to my host provider causes WordPress to generate my HTML pages from scratch?
The definitive answer is to check your WordPress installation for server-side caching plugins such as W3 Total Cache, WP Fastest Cache, WP Rocket, WP Super Cache, etc., or check if your web host provides server-level caching such as through a NGINX server, Varnish, Memcached, etc.
I know neither of these apply to this website (though HostGator pre-installs a caching plugin which, from what I’ve found, isn’t worth keeping). If I didn’t have access to a website’s server, I could check the GTmetrix report to make an educated guess as to whether HTML pages are cached.
- I go to GTmetrix
- Enter the URL to analyze and click the Analyze button. You may want to run this test 3 times to make sure the server has an opportunity to generate a cached page (if enabled).
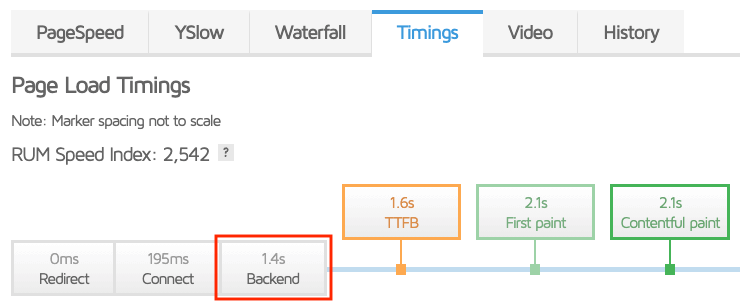
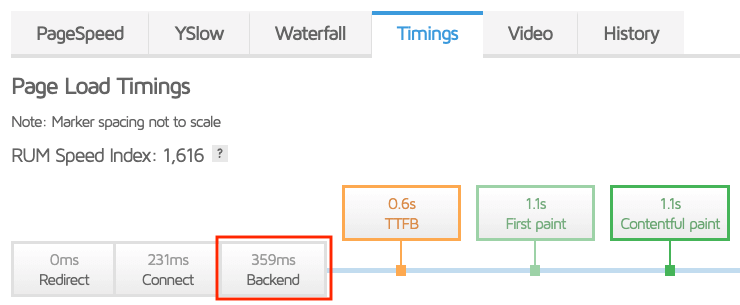
- When the analysis is done, I click on the Timings tab.
On the Timings tab I check the Backend value. As you can see for my Pretend Web Design webpage, it is quite slow at 1.4 seconds. This indicates to me that WordPress is generating this page with every visit. Even on a budget web host provider with server-side caching, it shouldn’t take 1.4 seconds to return a cached HTML page.
Setup Caching Plugin
I will use Automatic’s WP Super Cache plugin to cache the HTML pages on this website. It is completely free and one of the most popular caching plugins.
I select all of the recommended settings plus select a few other options.
Turn on Caching
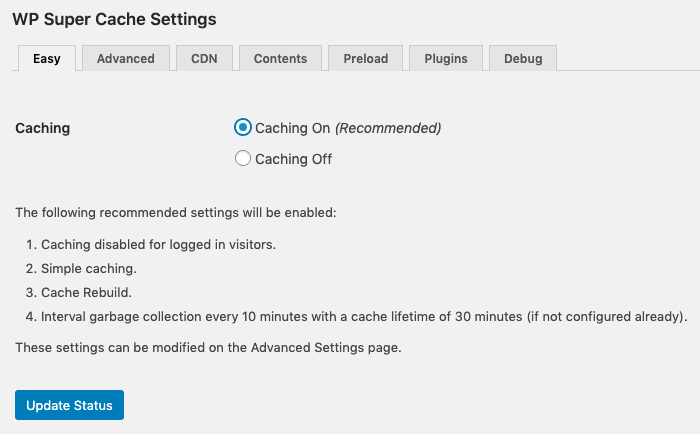
On the Easy tab of “WP Super Cache Settings”, I select Caching On and then click the Update Status button.
Select Advanced Options
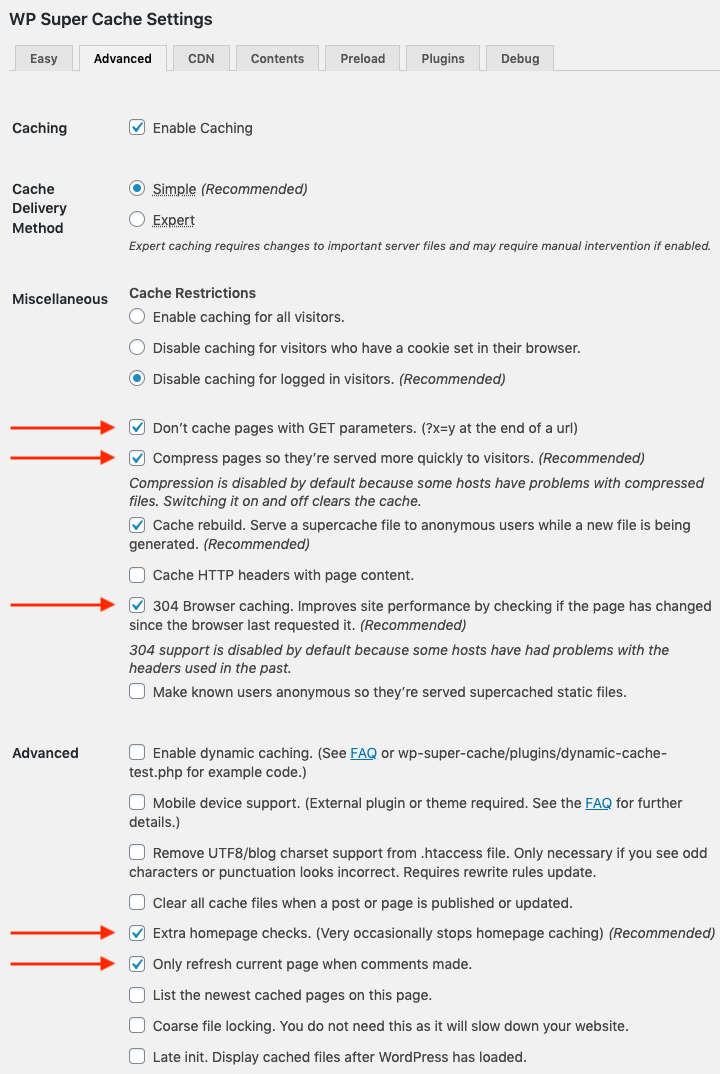
On the Advanced tab of “WP Super Cache Settings”, I select the recommended options that are not already selected and a couple more options:
- Don’t cache pages with GET parameters. (avoids caching pages that are different for each visitor)
- Compress pages so they’re served more quickly to visitors.
- 304 Browser caching.
- Extra homepage checks.
- Only refresh current page when comments made. (I don’t need any other pages to be refreshed when a comment is made.)
I then scroll down to click the Update Status button to save changes.
(Update on November 11, 2020 – While working on part 5 of this series, I found the Expiry Time & Garbage Collection settings do apply when Preload Mode is enabled. When I first wrote this article I didn’t change these settings.)
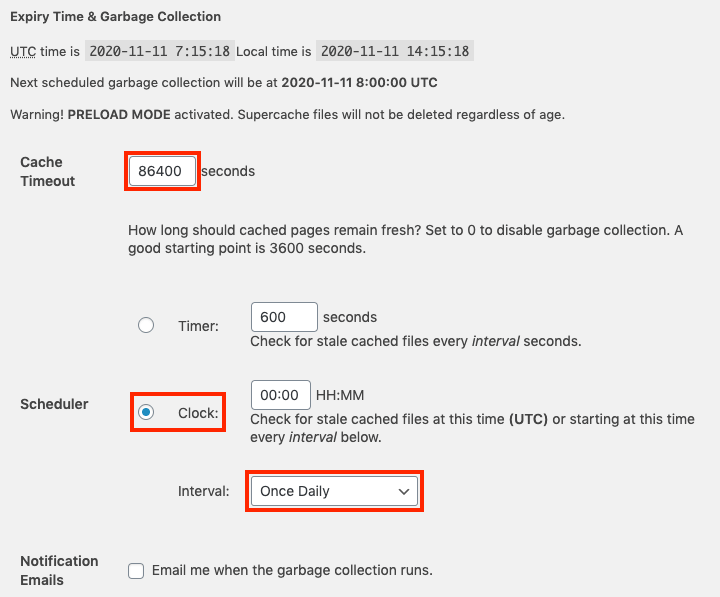
Scrolling further down on the Advanced tab, I come to the Expiry Time & Garbage Collection settings.
I initially thought these settings did not apply while Preload Mode (see next section) is enabled, but they do. The cache timeout still applies to a file if it is requested and is past Cache Timeout age, and the scheduler still runs even though it doesn’t delete Supercache files.
Here is how I have configured these settings keeping in mind I will enable Preload Mode in the next section:
- Cache Timeout – Set to 86,400 seconds (24 hours). I will set Preload Mode to the same duration. This will ensure a file that doesn’t change is regenerated only once per day when Preload runs.
- Scheduler – Set to Clock at an interval of Once Daily so garbage collection runs once a day. I believe garbage collection has no benefit in my case, so I reduce server load by running it infrequently.
I then scroll down and click the Change Expiration button to save changes.
Configure Preload Mode Options
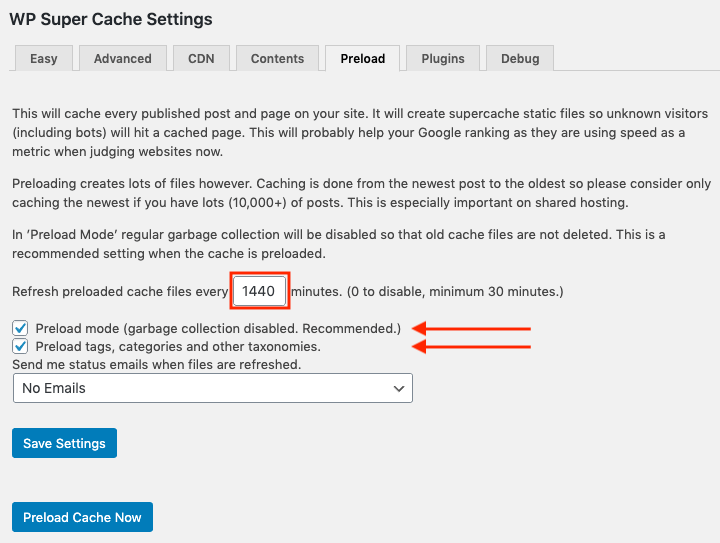
On the Preload tab of “WP Super Cache Settings”:
- I set the preloaded cache refresh interval to 1440 minutes (24 hours)
- Select Preload mode
- Select Preload tags, categories and other taxonomies.
I click the Save Settings button and then the Preload Cache Now button.
I decided to use Preload Mode because I want my pages to be proactively cached and ready to serve to my visitors. The overhead of preloading webpages on my site is low because I have so few pages.
I set the preloaded cache refresh and “Cache Timeout” on the Advanced tab to once per day because all changes to my content (comments by visitors or pages edit by me) are detected by WP Super Cache. WP Super Cache detects the changes and invalidates the changed pages. If I had external content on my website, then I would want to set the refresh and timeout intervals to a smaller value that makes sense with how often the external content changes.
If in the future I add substantially more pages or posts, I will reevaluate the performance of this caching mode.
Test
Now that I have caching in place, I go again to GTmetrix, run a test, and click on the Timings tab. The Backend duration has dropped by over 1 second. This is a huge time savings.
In addition to testing speed, I will monitor my pages and posts for any problems since the three recommended WP Super Cache settings I selected warned there could be incompatibilities with some web hosts. So far I see no problems with HostGator.
Results
| Test | Time To First Byte | First Contentful Paint | Fully Loaded | Total Page Size | Requests |
|---|---|---|---|---|---|
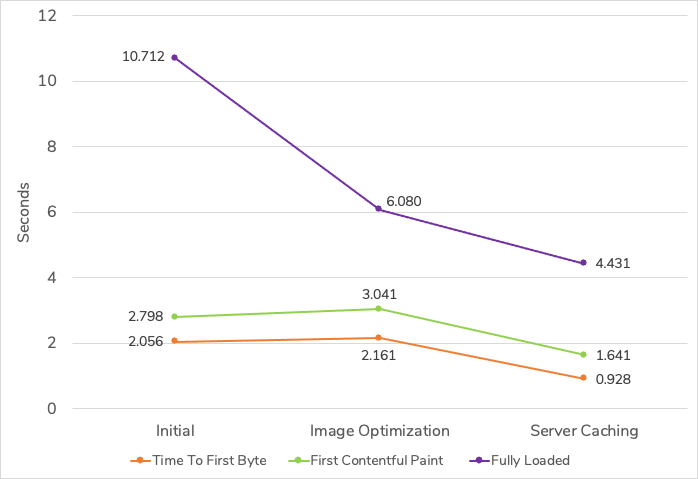
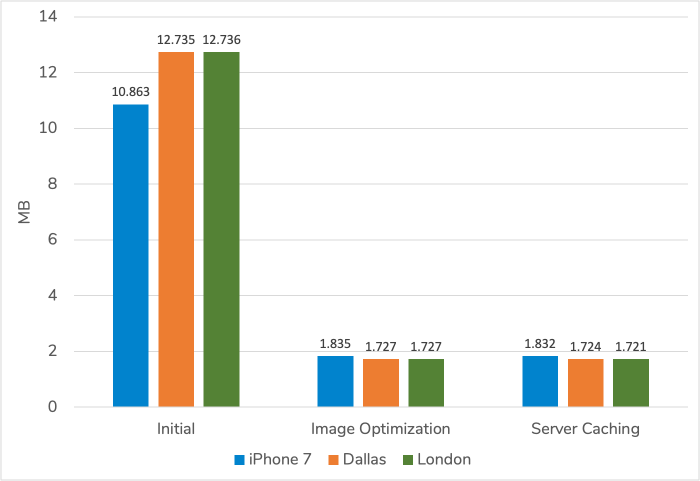
| iPhone 7, Dallas | 928 ms | 1641 ms | 4431 ms | 1.832 MB | 68 |
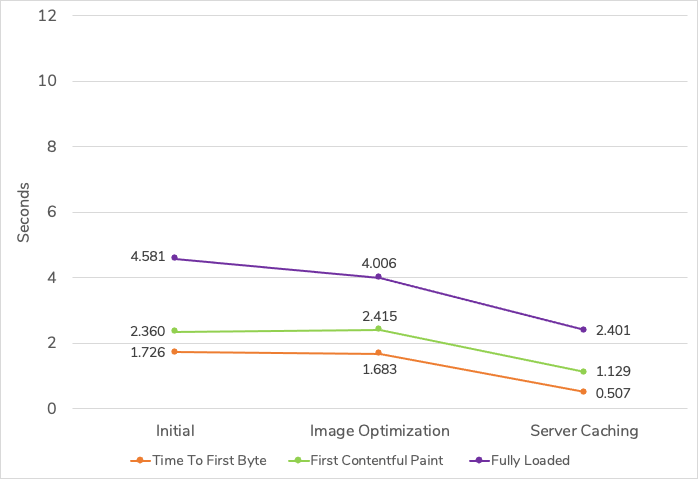
| Desktop, Dallas | 507 ms | 1129 ms | 2401 ms | 1.724 MB | 70 |
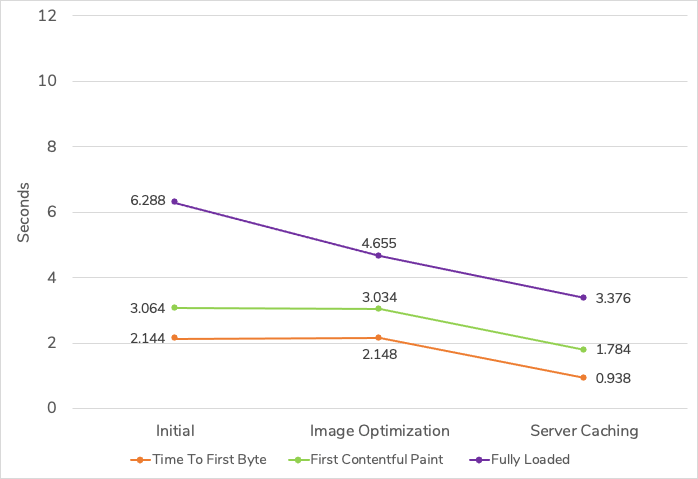
| Desktop, London | 938 ms | 1784 ms | 3376 ms | 1.721 MB | 70 |
Tests performed with GTmetrix on URL https://www.sherbeck.com/pretend-web-design/. Median values, collected hourly over 24 hours.
Page Timings
iPhone 7, Dallas
Desktop, Dallas
Desktop, London
Total Page Size
A little bit more data was saved by selecting the “Compress pages so they’re served more quickly to visitors.” option. Although Gzip compression is already enabled on my web host, I assume WP Super Cache uses a higher compression setting to achieve a smaller HTML file.
Summary
The table below shows the performance gains from a server-side caching plugin.
| Test | Time | Data |
|---|---|---|
| iPhone 7, Dallas | ||
| Desktop, Dallas | ||
| Desktop, London |
(Time = Fully Loaded; Data = Total Page Size)
Adding a caching plugin to my WordPress installation decreased the fully loaded time across all three tests by about 1.3 to 1.6 seconds. I am still 2.4 seconds away from my fully loaded goal of 2 seconds for mobile, but this was a major improvement.
Though I achieved good results here, I could have much better Time To First Byte (TTFB) timings. Ultimately I need to move to a faster web host which I will be doing towards the end of this series.


